Account Dashboard
Dashboard
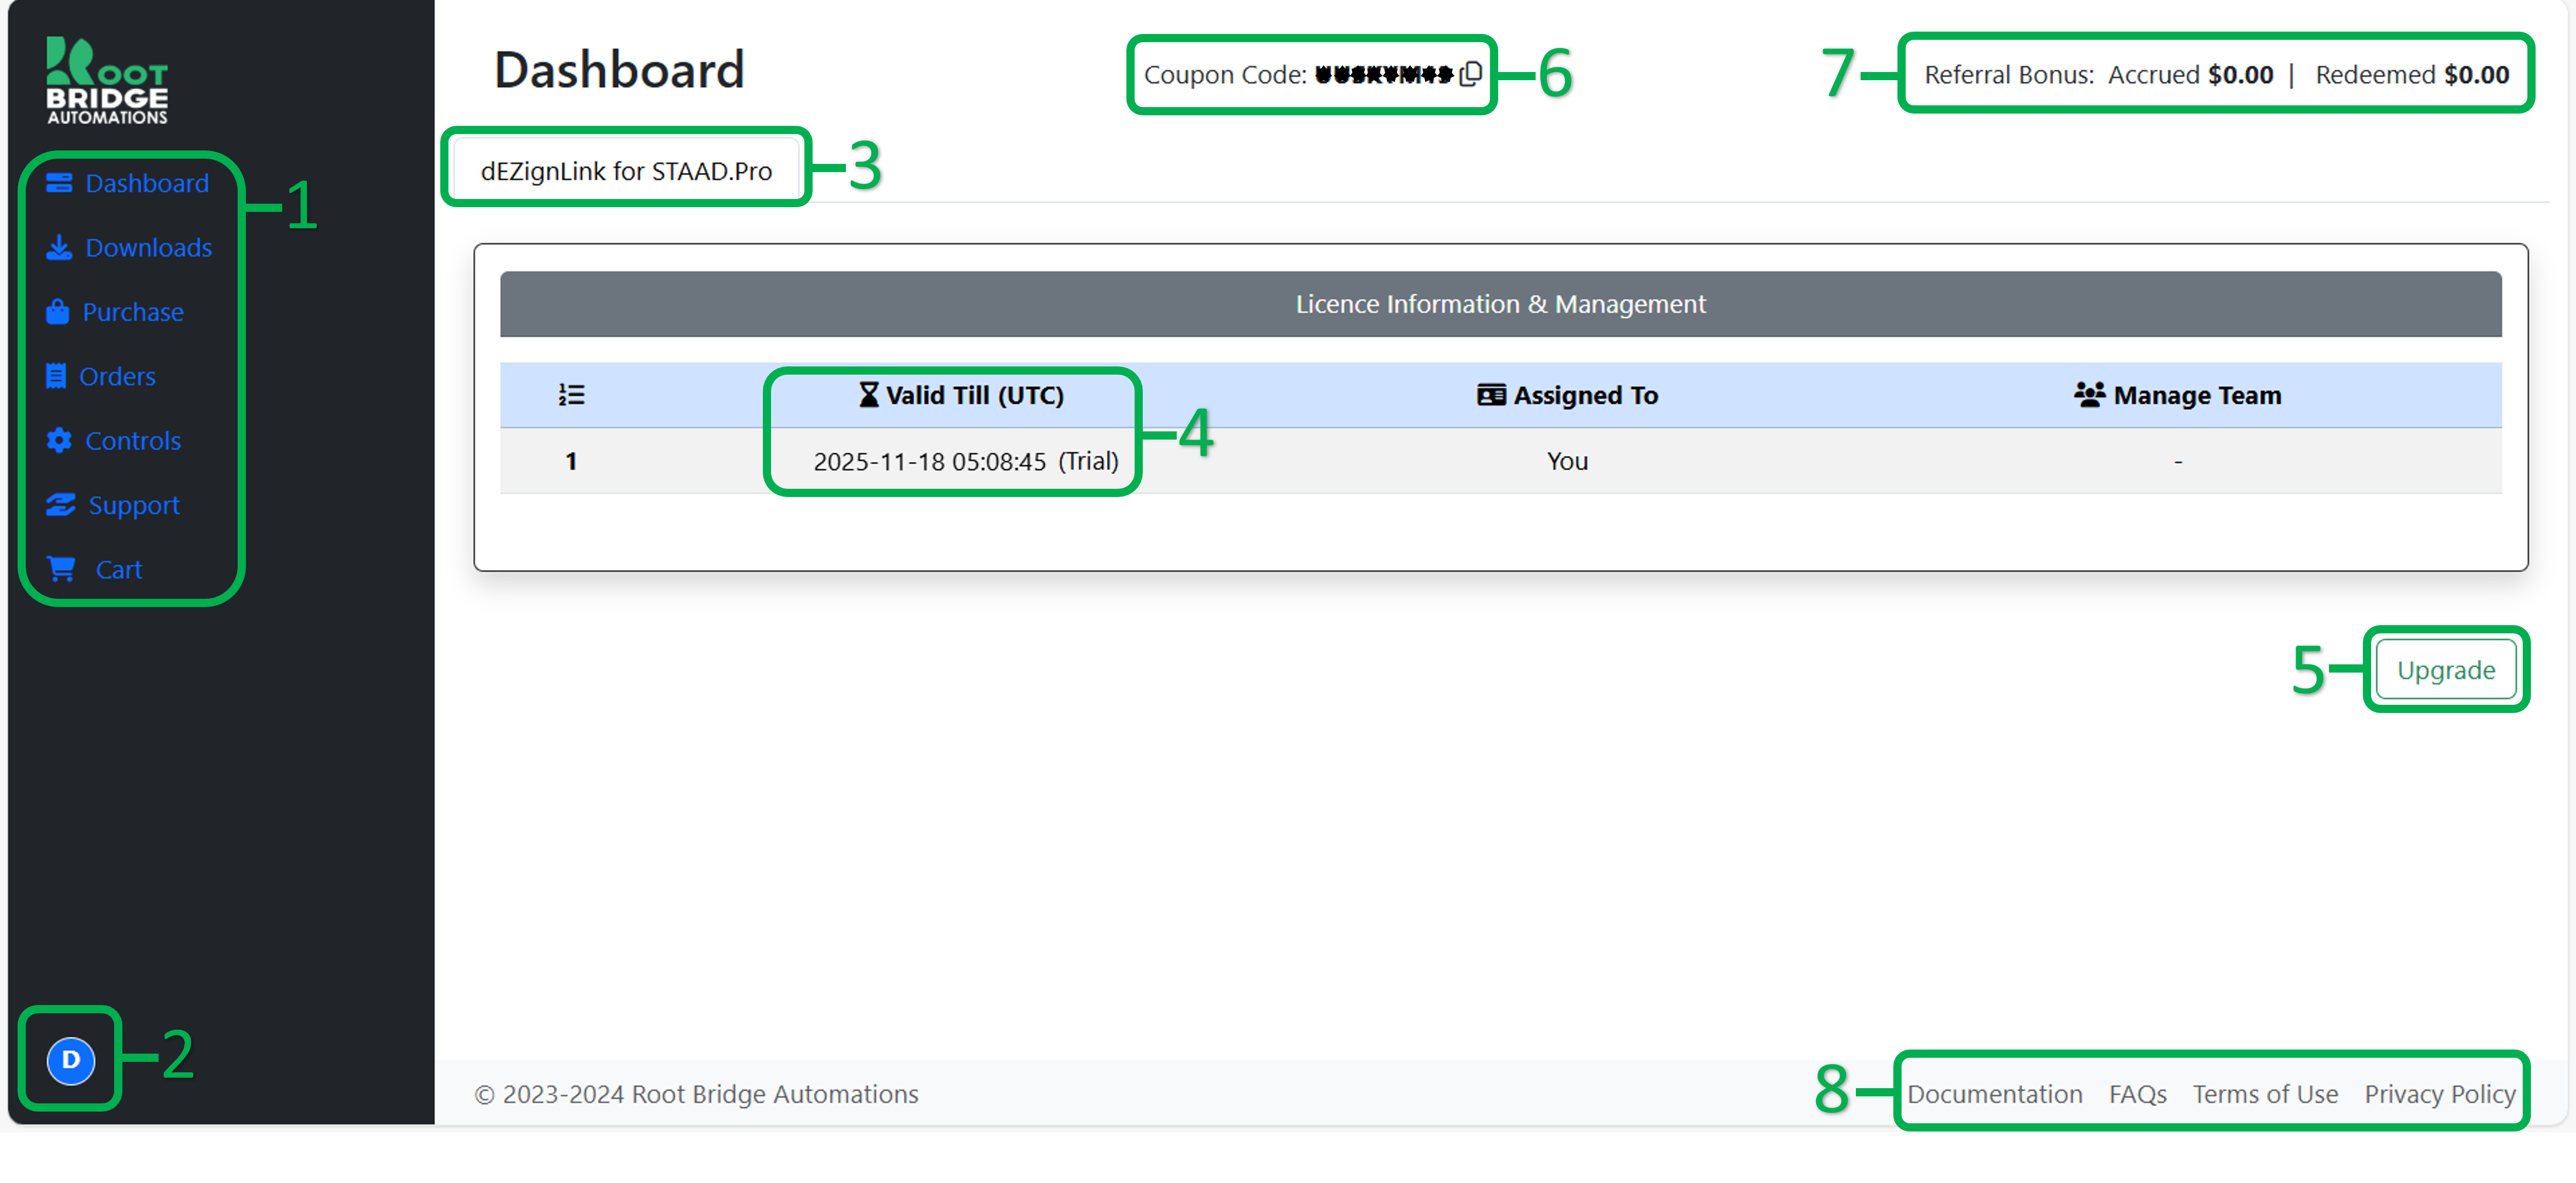
The various sections of the Dashboard view are described below:
- Sidebar: For dashboard navigation.
- Logout Button: Click to open menu. Click on 'Sign out' to log out from your account.
- App Name: Name of your subscribed application.
- Valid Till (UTC): Date and time of licence expiry. All displayed times are UTC.
- Upgrade Licence: Go to purchase section to upgrade your trial licence.
- Coupon Code: Your unique coupon code. You can share the same with others. For every purchase made by someone utilizing your coupon code, you earn Referral Bonus. Also, the purchaser gets a discount.
- Referral Bonus: Displays Accrued (total accumulated) and Redeemed (utilized for purchases) values of your referral bonus.
- Useful Links: Links to the respective named sections in our documentation library.
If you are subscribed to multiple licences, the Dashboard converts to an Admin Console as shown below:
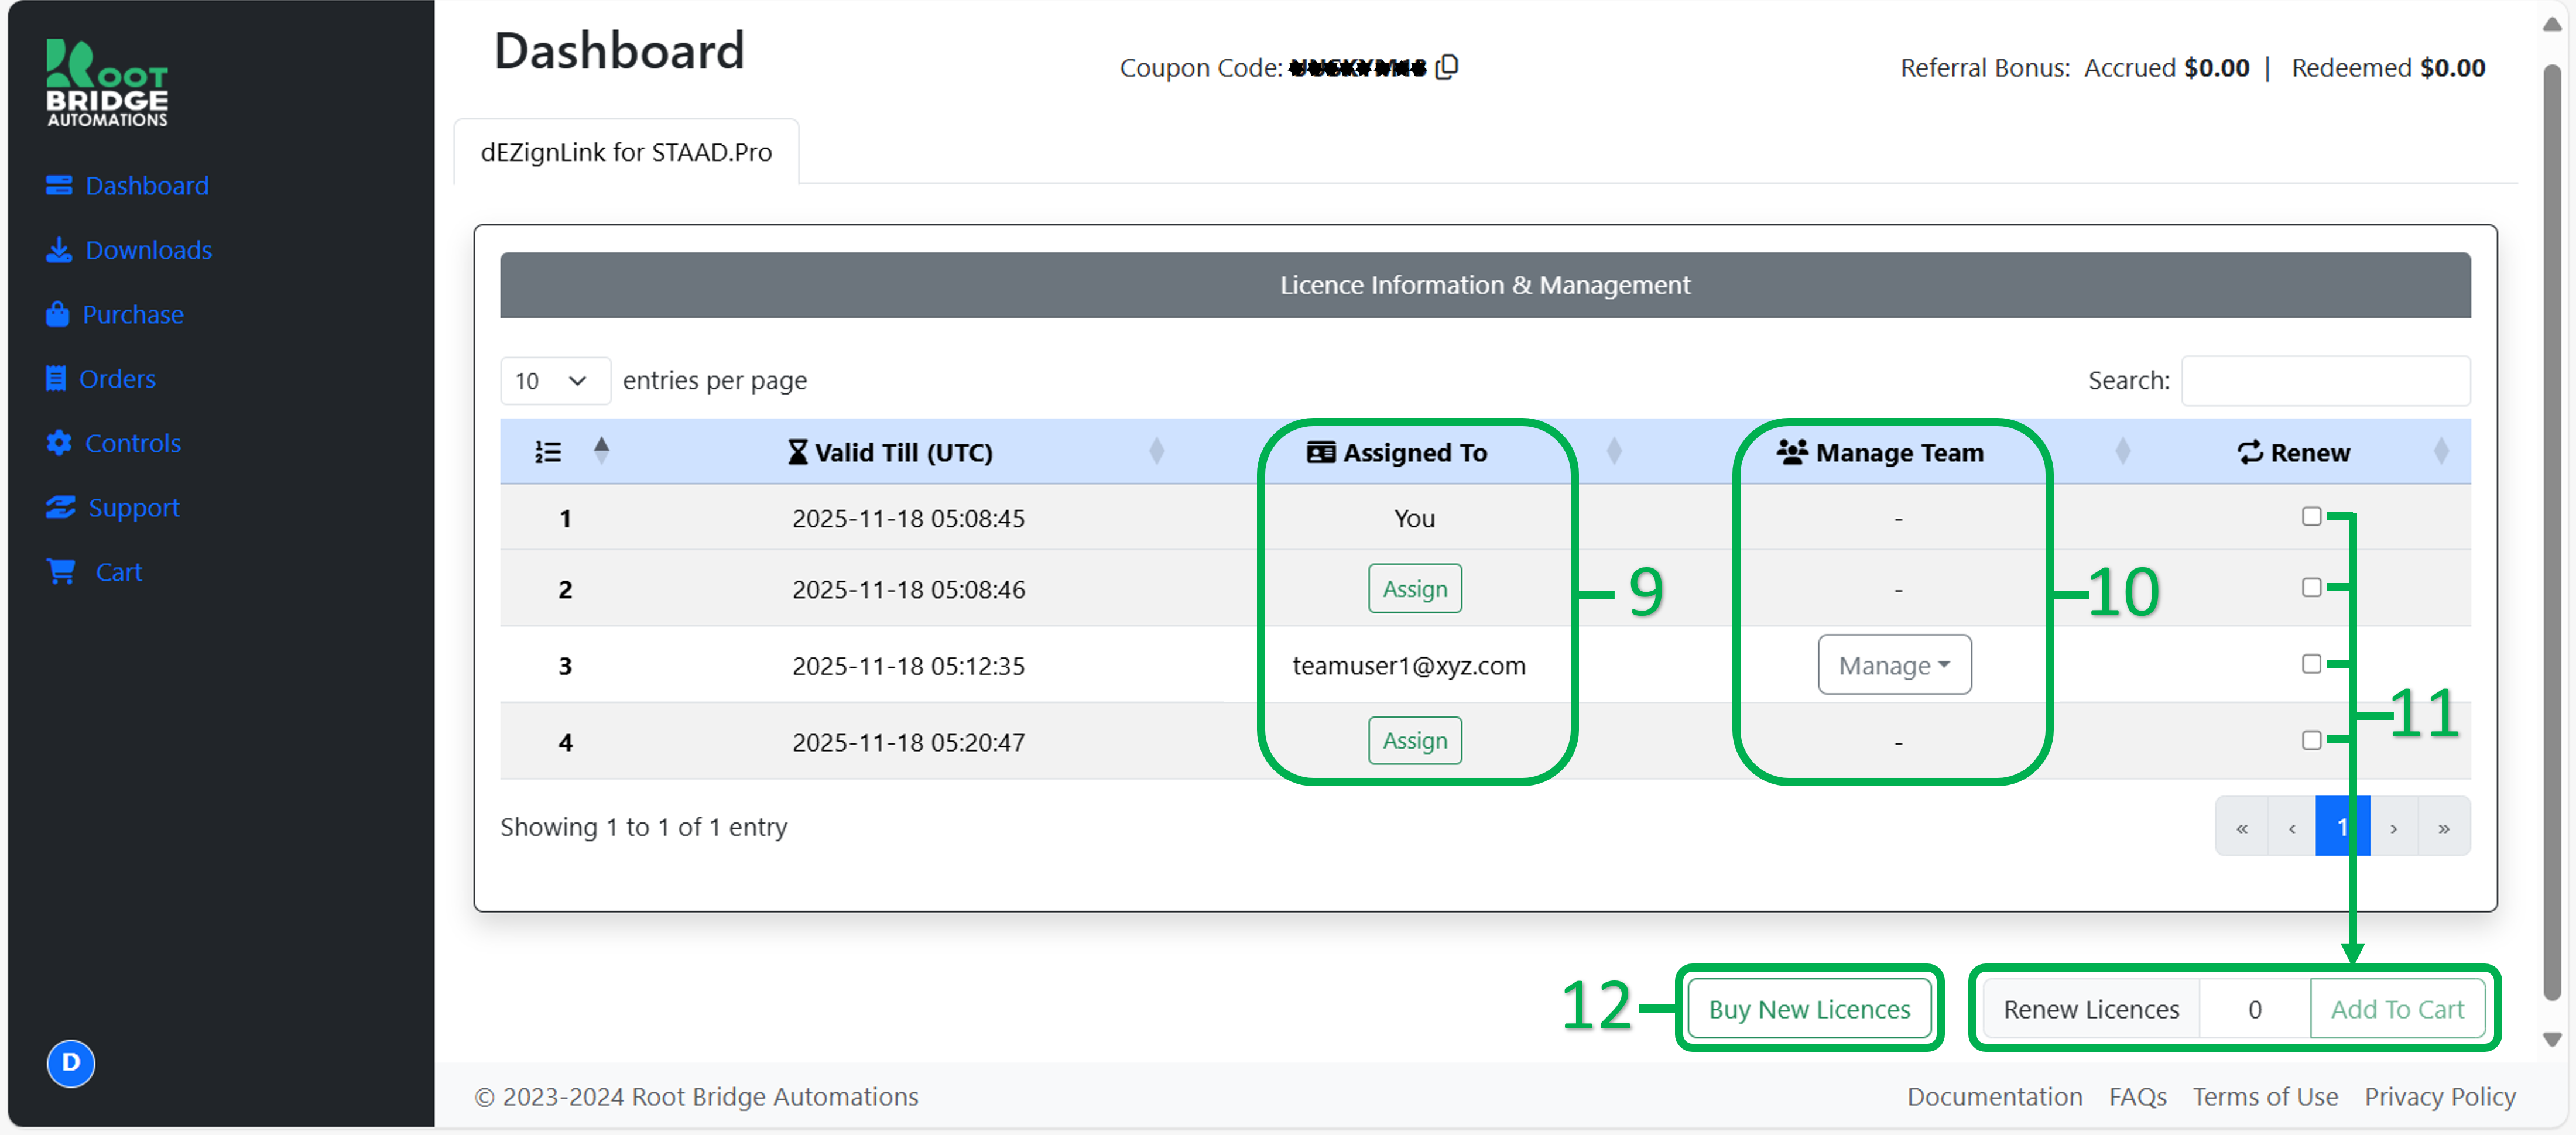
The various sections of the Admin Console are described below:
- Assigned To: Assign licences to team members by clicking on the 'Assign' button. A popup window opens as shown below:
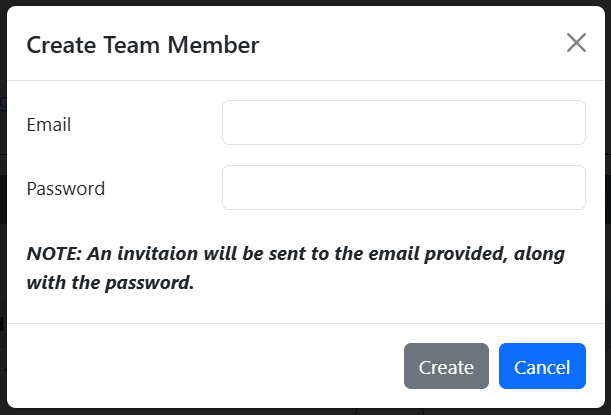
- Enter valid email address of the team member and a suitable password, and click 'Create'. The email address of the team member shall be visible against the respective assigned licence.
- Manage Team: Once a licence has been assigned to a team member, the 'Manage' button shall be visible against the respective licence. Click on the 'Manage' button to open a menu as shown below:
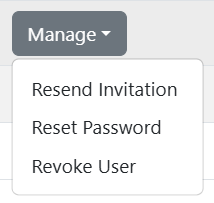
- Resend Invitation: In case the team member did not receive the invitation mail at the time of licence assignment, or the email is lost due to any reason.
- Reset Password: In case the team member unable to log in, or the password is suspected of being compromised.
- Revoke User: In order to un-assign a licence from any team member. Once done, the 'Assign' button shall re-appear against the respective licence.
- Renew Licences: Tick the boxes against the licences which you intend to renew. The total count will update in the numeric display field to the left of the 'Add To Cart' button.
- Buy New Licences: Go to purchase section to buy new licence/s as required.
Downloads

The various sections of the Downloads view are described below:
- App Name: Name of the application you are subscribed to.
- App Version: Current version of the application.
- Download Size: Approximate download size of the application installer file.
- Download Button: Click to download the application installer file.
Purchase
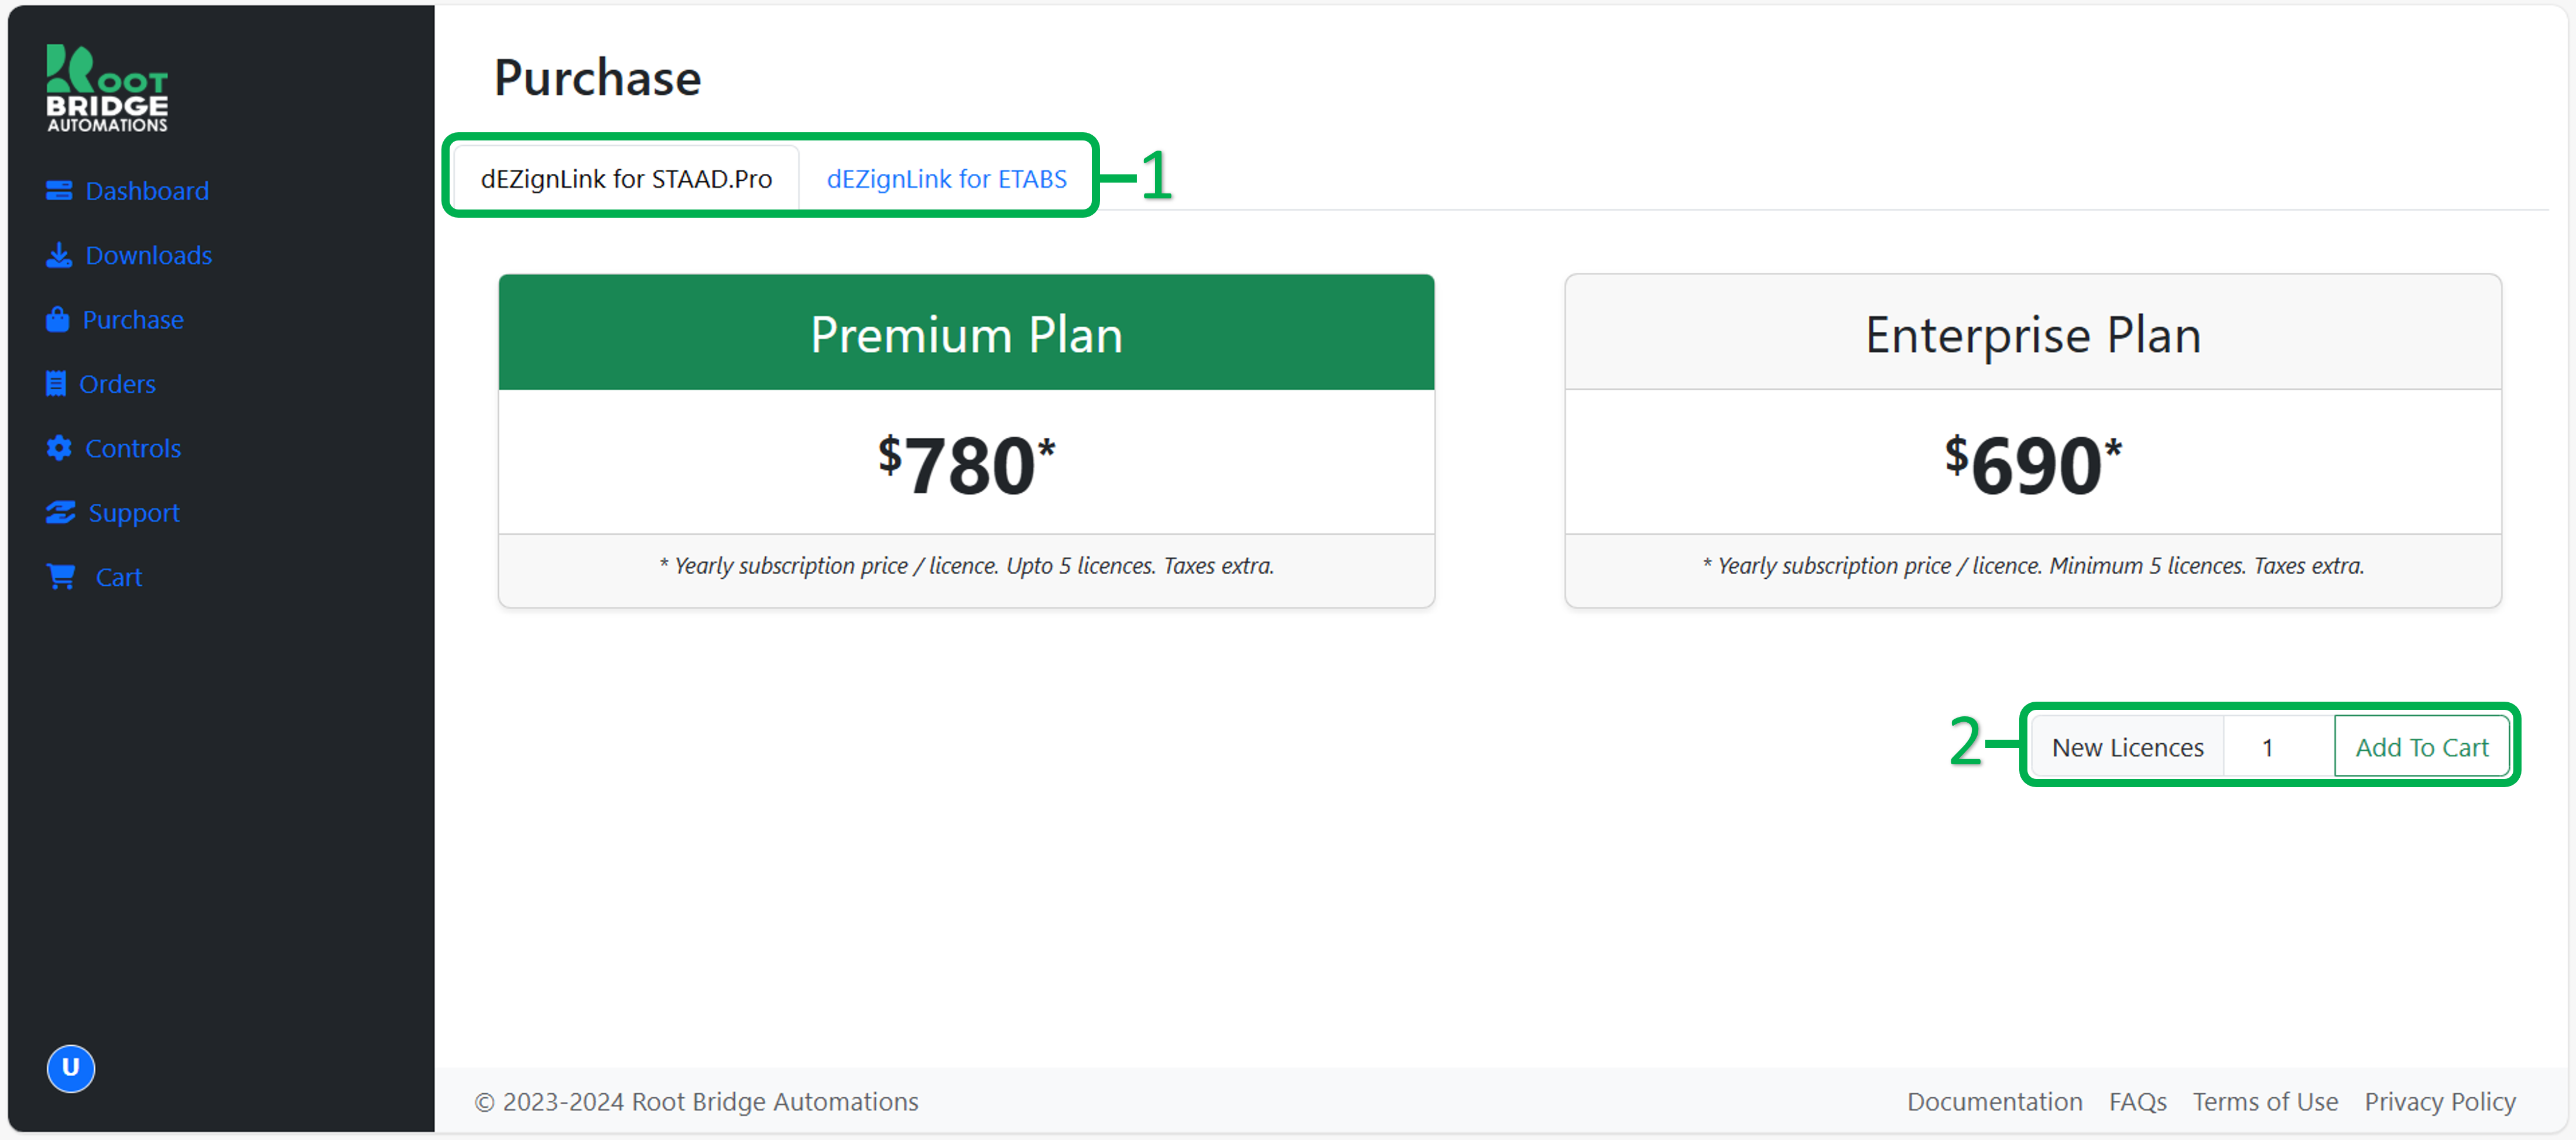
The various sections of the Purchase view are described below:
- App Name: Name of the application for which purchase price is being displayed.
- Add To Cart: Number of licences is to be entered in the numeric display field.
Orders
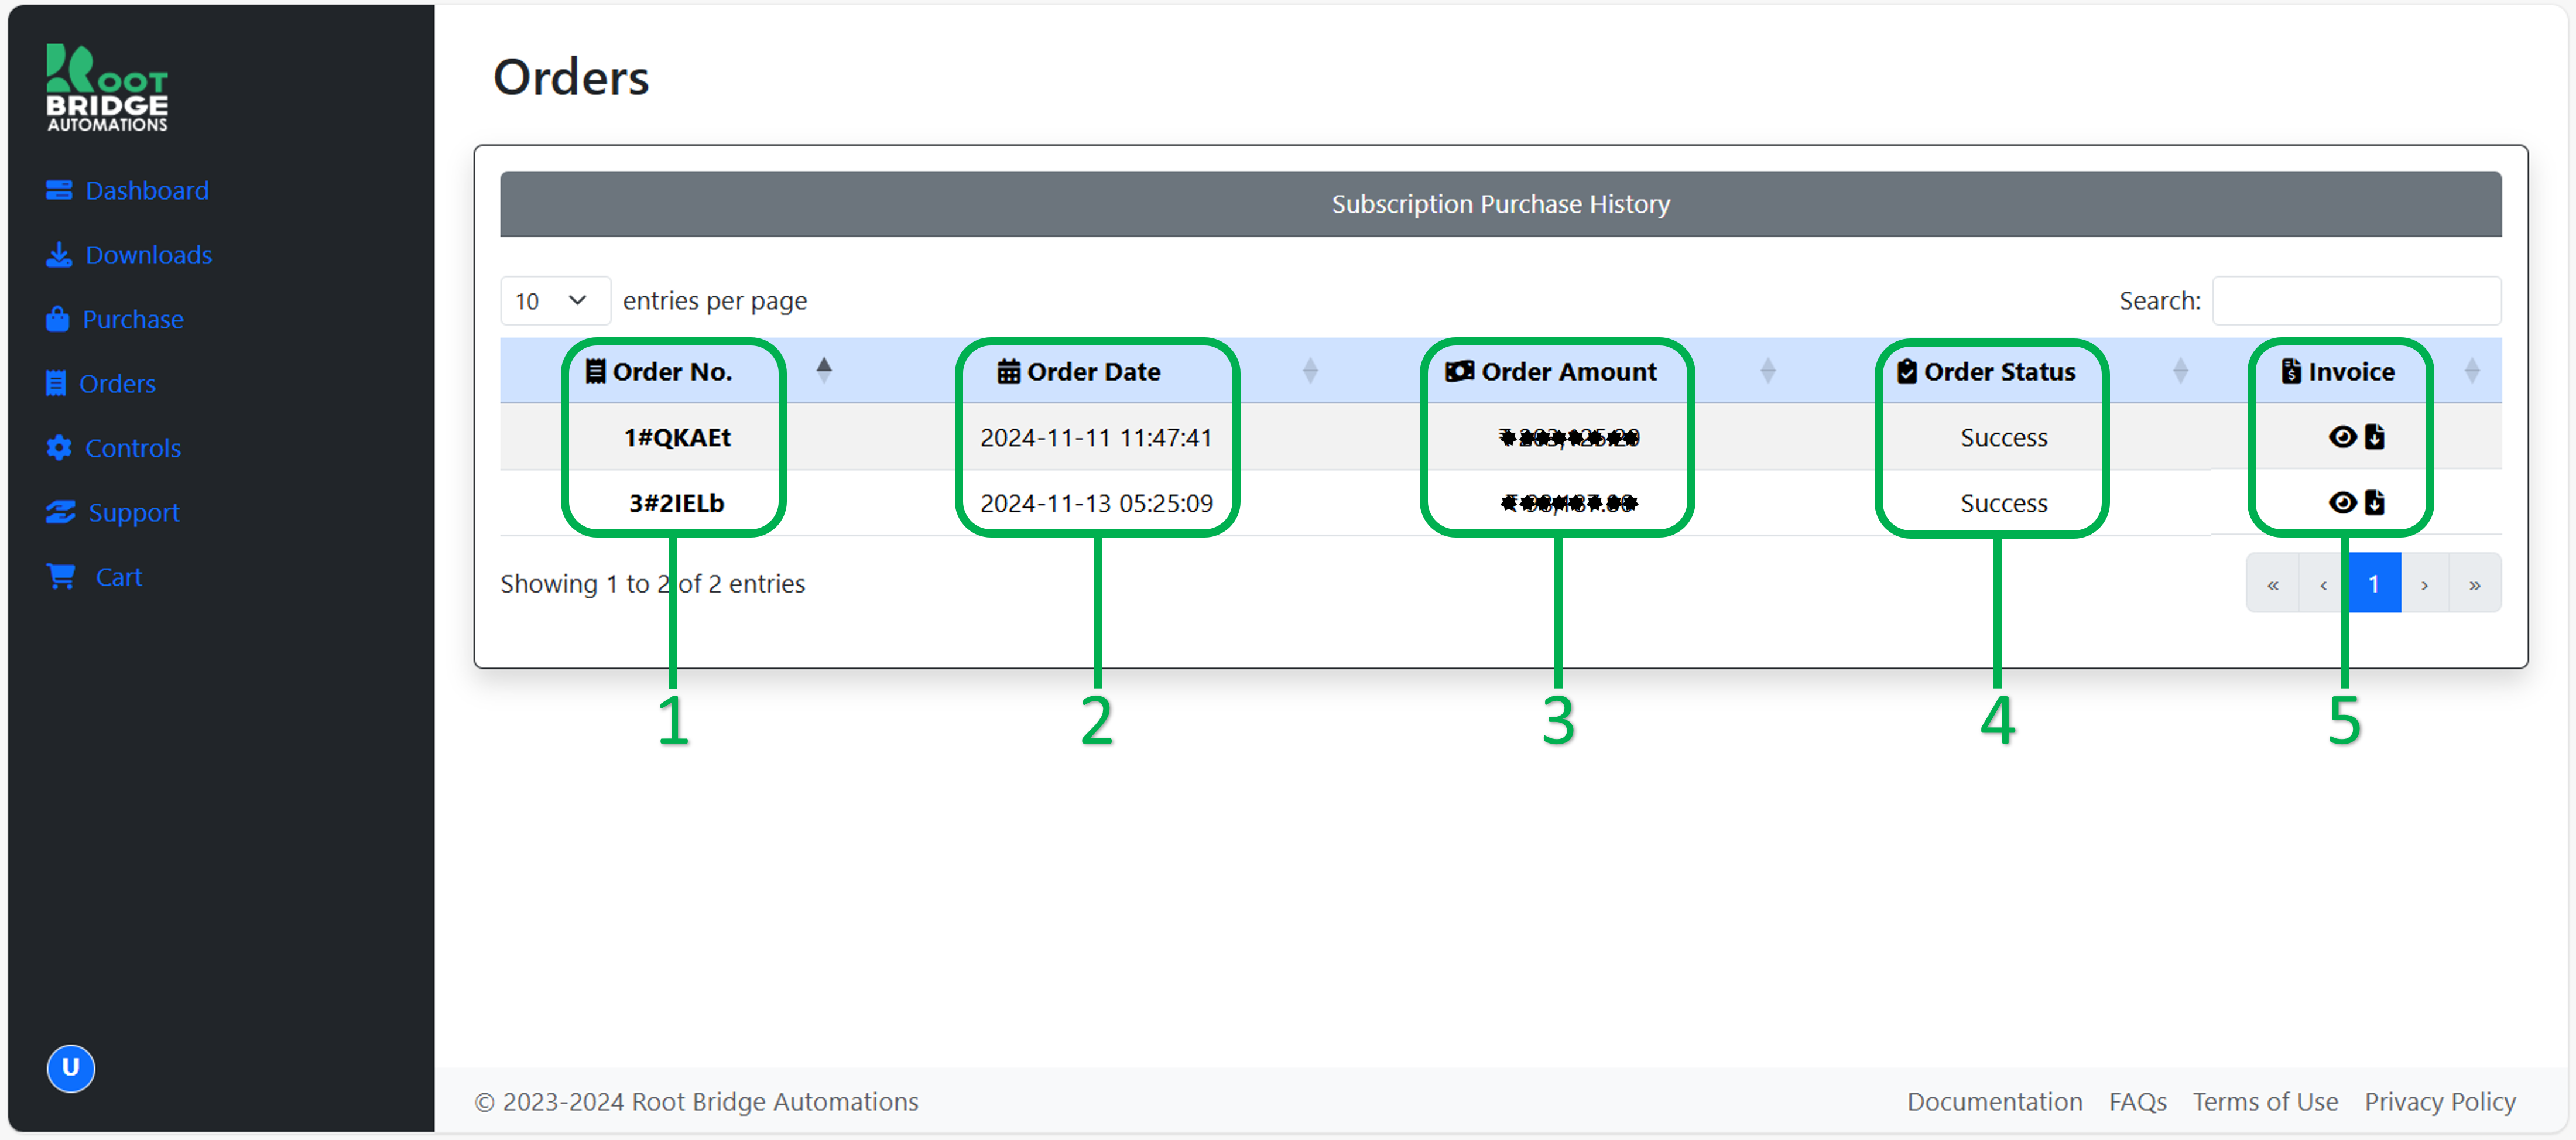
The various sections of the Orders view are described below:
- Order No.: Reference number of the order.
- Order Date: Date of the order.
- Order Amount: Total amount paid against the order.
- Order Status: Status of the order.
- Invoice View / Download: Click on the
icon to view the order. Click on the
icon to download a signed invoice in pdf format.
Controls

The various sections of the Controls view are described below:
- Update Password: If you intend to change your password.
- Delete Account: If you intend to delete your account. Kindly note that once the account is deleted, all the licences that you own under the account, whether trial, expired, or paid, shall be deleted from our server and recovery of the same shall not be possible under any circumstances.
Support

The various sections of the Support view are described below:
- Instructions: Link to the Help section in our documentation library.
- Email Us: In case you were unable to find the answer you sought, then kindly drop us an email in the address mentioned.
- Contact Form: For feedbacks and suggestions.
Cart

The various sections of the Cart view are described below:
- Items in Cart: Application licence/s, whether new or renewal, shall be listed here.
- Cart Summary: Complete summary of the purchase.
- Apply Coupon: If you have a referral coupon, enter the code here and click on the 'Apply' button.
- Buyer Details for Invoice: Optional fields. If you want these fields to be captured in the generated invoice, then enter details in respective fields. If not provided, then the invoice shall display your registered email address under the 'Buyer' field.
- Region specific information:
- For customers from India:
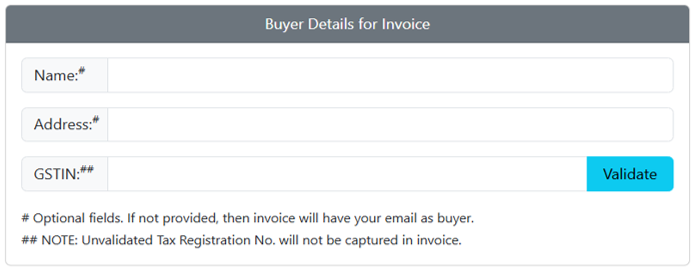
- GST registered customers from India can enter the GSTIN in the field provided. Enter the name and address in respective fields, and click the 'Validate' button. The registered name against the GSTIN shall be captured automatically upon successful validation. Kindly note that unvalidated GSTIN shall not be captured in the invoice, and no change shall be possible once the order is completed.
- Checkout: Once you are satisfied with all the details in the Cart, click on the 'Checkout' button to proceed to the payment gateway.